Types of inheritance in Entity Framework
For beginners, please review: Entity Framework Basics
In this blog, I will explore on how to use inheritance in Entity Framework as a part of Advanced Data Models. Basically there are 2 models of Inheritance in Entity Framework and they both actually depend on the database design:
Table-per-Hierarchy Inheritance:
One table in storage schema to maintain data for all the types in an inheritance hierarchy. So, basically there is only one table in database, but different types in Entity model that inherits from a base class and all mapped to that table.
Table-per-Type Inheritance:
Separate table in storage schema to maintain data for each type in the inheritance hierarchy. That means there might have several tables with one-to-one relationships. Each table is mapped to single Entity in the model. But there is a base Entity that is mapped to the very base table.
We will look into Table-per-Hierarchy Inheritance in this blog with example. Generally, Table-per-Hierarchy is type inheritance which is having one table in Database but in Conceptual model of Entity Framework, the Entities are inherited from base Entity. For ex.: Consider real life development scenario, we often have a single table in Database having all the master data in the application ex.: Country, State, City, etc.
Consider below table which will hold all the master data:
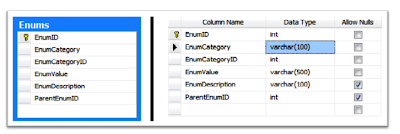
In the above table, we are going to have all the Master Table Data along with parent child relationship among them. But through EF - Table-Per-Hierarchy, we will expose all the Entities to the users providing a level of abstraction. Please refer below figure in Entity Framework:
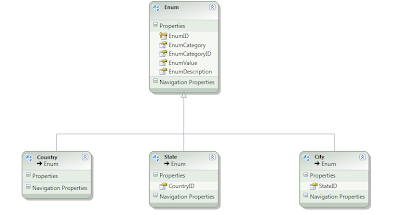
For one table in Database, we will expose Country, State, City as separate Entities referring to same table. So, let see how to achieve the same in Entity Framework:
1. First Add New Model in your Project
a. Add New Item by Right Clicking Project,
b. Select Add
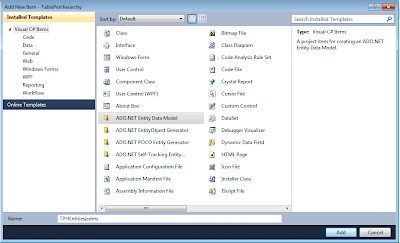
c. Add New Item and ADO.NET Entity Data Model
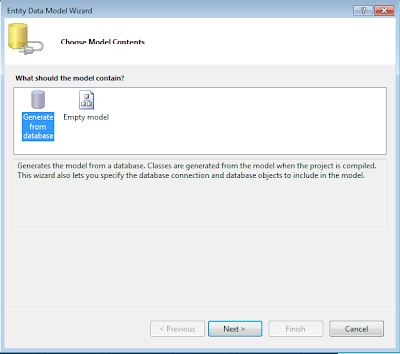
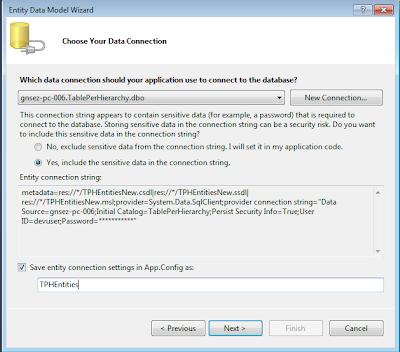
2. Entity Data Model Wizard will open. Select Generate from Database
3. Configuration your model and DB:
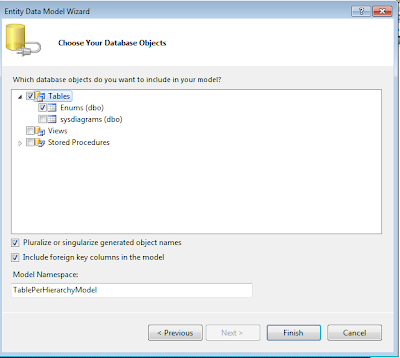
4. Select the Enums Table and Press Finish:
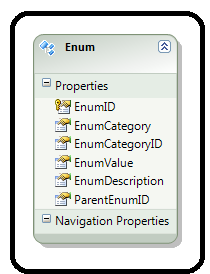
5. You will get the below Entity in Entity Model:
6. Now in Enum Table in Database, we have three Master Category naming Country, State and City having
a. EnumCategoryID = 1 represents Country
b. EnumCategoryID = 2 represents State
c. EnumCategoryID = 3 represents City
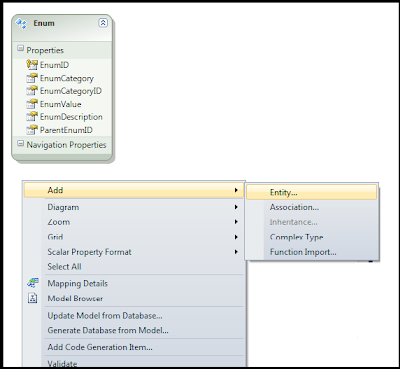
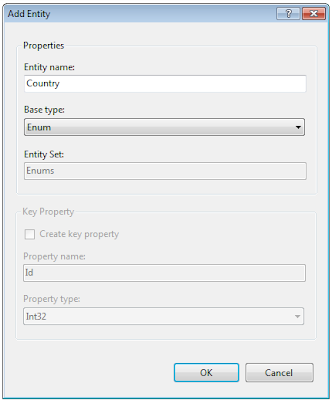
So, first add the Country Entity as shown in below figure:
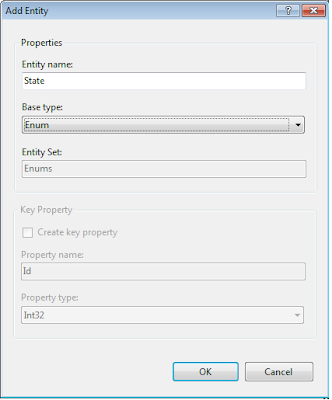
Do same for State and City Entities:

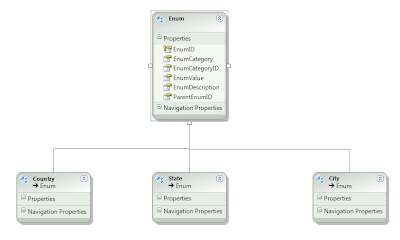
Once all the Entities are added, the model will look like:
7. Defining Columns in derived Entities.
Now, ParentEnumID is key relating the related records in Enum Table. For ex.: Enum table will contain records of Countries, States and Cities. So, for relationship between Country, State and City, ParentEnumID will be used which will be CountryID in State Entity and StateID in City Entity. So, Add Scalar Property CountryID in State and StateID in City Entity.
In order to add new Scalar Property,
a. Select “State” Entity, right click
b. Click Add --> Scalar Property.
Please note that Scalar Property should have the same data type as that in Base Table.
In our ex.: ParentEnumID is int, so Country ID and State ID will be int only.
Once your columns are added the model should look like:

8. Define Table Mappings:
Earlier I mentioned that EnumCategoryID is used to identity each Entity namely Country, State and City. For example EnumCategoryID= 1 represents that Entity is Country. Moreover, we need to map CountryID in State entity and StateID in City entity to ParentEnumID in Enum entity. So, let us now add Table mapping.
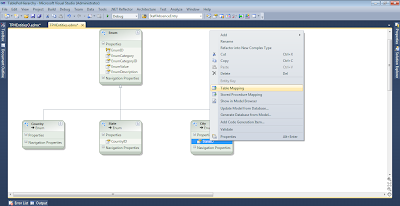
For adding Table Mapping, select Entity, Right click and select Table mapping as shown in figure:
Then, for Country, add Condition EnumCategoryID = 1, as there would be no ParentEnumID for Country, we will leave it blank.

For State, add Condition EnumCategoryID =2, in ColumMappings map ParentEnumID to CountryID
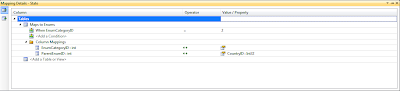
For City, add Condition EnumCategoryID =3, in ColumMappings map ParentEnumID to StateID

Once you are done, please don’t forget to delete the ParentEnumID and EnumCategoryID property from Enum Entity as it is not needed anymore.
9. Define An Abstract Class:
As I mentioned earlier, for demonstration I need to set Enum Entity as Abstract. However you can still define a mapping for it instead of making it abstract. You should set an Base Entity as Abstract only if you know there will be no direct instantiation from that Entity. For the case here, I would be having only Country, State and City entities. There is no simple Enum.
To set an Entity as Abstract:
1. Right Click on the Enum Entity, select Properties form context menu.
2. From Properties window and Under Code Generation group, set Abstract property to True. Click Ok on the confirmation message that appears.
Conclusion:
Let see what is exacting happing in the Model by exploring Conceptul Model, Storage Model and Mapping Model:
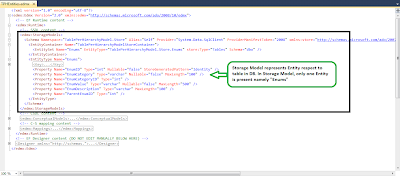
a. Storage Model
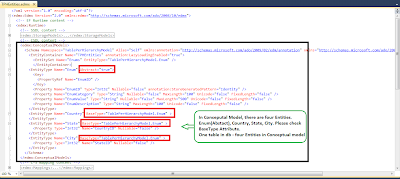
b. Conceptual Model
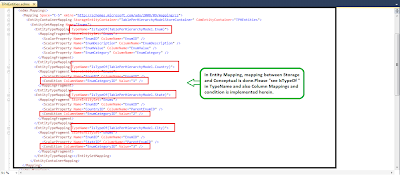
c. Mapping Model:
Find the sample code. And in few days, I will publish post on using the Table per Hierarchy in the Application with CRUD operations and Table-Per-Type example and explanation.
Thanks,
Paras Sanghani
TablePerHierarchy
For beginners, please review: Entity Framework Basics
In this blog, I will explore on how to use inheritance in Entity Framework as a part of Advanced Data Models. Basically there are 2 models of Inheritance in Entity Framework and they both actually depend on the database design:
Table-per-Hierarchy Inheritance:
One table in storage schema to maintain data for all the types in an inheritance hierarchy. So, basically there is only one table in database, but different types in Entity model that inherits from a base class and all mapped to that table.
Table-per-Type Inheritance:
Separate table in storage schema to maintain data for each type in the inheritance hierarchy. That means there might have several tables with one-to-one relationships. Each table is mapped to single Entity in the model. But there is a base Entity that is mapped to the very base table.
We will look into Table-per-Hierarchy Inheritance in this blog with example. Generally, Table-per-Hierarchy is type inheritance which is having one table in Database but in Conceptual model of Entity Framework, the Entities are inherited from base Entity. For ex.: Consider real life development scenario, we often have a single table in Database having all the master data in the application ex.: Country, State, City, etc.
Consider below table which will hold all the master data:

In the above table, we are going to have all the Master Table Data along with parent child relationship among them. But through EF - Table-Per-Hierarchy, we will expose all the Entities to the users providing a level of abstraction. Please refer below figure in Entity Framework:

For one table in Database, we will expose Country, State, City as separate Entities referring to same table. So, let see how to achieve the same in Entity Framework:
1. First Add New Model in your Project
a. Add New Item by Right Clicking Project,
b. Select Add
c. Add New Item and ADO.NET Entity Data Model

2. Entity Data Model Wizard will open. Select Generate from Database

3. Configuration your model and DB:

4. Select the Enums Table and Press Finish:

5. You will get the below Entity in Entity Model:

6. Now in Enum Table in Database, we have three Master Category naming Country, State and City having
a. EnumCategoryID = 1 represents Country
b. EnumCategoryID = 2 represents State
c. EnumCategoryID = 3 represents City
So, first add the Country Entity as shown in below figure:


Do same for State and City Entities:


Once all the Entities are added, the model will look like:

7. Defining Columns in derived Entities.
Now, ParentEnumID is key relating the related records in Enum Table. For ex.: Enum table will contain records of Countries, States and Cities. So, for relationship between Country, State and City, ParentEnumID will be used which will be CountryID in State Entity and StateID in City Entity. So, Add Scalar Property CountryID in State and StateID in City Entity.
In order to add new Scalar Property,
a. Select “State” Entity, right click
b. Click Add --> Scalar Property.
Please note that Scalar Property should have the same data type as that in Base Table.
In our ex.: ParentEnumID is int, so Country ID and State ID will be int only.
Once your columns are added the model should look like:

8. Define Table Mappings:
Earlier I mentioned that EnumCategoryID is used to identity each Entity namely Country, State and City. For example EnumCategoryID= 1 represents that Entity is Country. Moreover, we need to map CountryID in State entity and StateID in City entity to ParentEnumID in Enum entity. So, let us now add Table mapping.
For adding Table Mapping, select Entity, Right click and select Table mapping as shown in figure:

Then, for Country, add Condition EnumCategoryID = 1, as there would be no ParentEnumID for Country, we will leave it blank.

For State, add Condition EnumCategoryID =2, in ColumMappings map ParentEnumID to CountryID

For City, add Condition EnumCategoryID =3, in ColumMappings map ParentEnumID to StateID

Once you are done, please don’t forget to delete the ParentEnumID and EnumCategoryID property from Enum Entity as it is not needed anymore.
9. Define An Abstract Class:
As I mentioned earlier, for demonstration I need to set Enum Entity as Abstract. However you can still define a mapping for it instead of making it abstract. You should set an Base Entity as Abstract only if you know there will be no direct instantiation from that Entity. For the case here, I would be having only Country, State and City entities. There is no simple Enum.
To set an Entity as Abstract:
1. Right Click on the Enum Entity, select Properties form context menu.
2. From Properties window and Under Code Generation group, set Abstract property to True. Click Ok on the confirmation message that appears.
Conclusion:
Let see what is exacting happing in the Model by exploring Conceptul Model, Storage Model and Mapping Model:
a. Storage Model

b. Conceptual Model

c. Mapping Model:

Find the sample code. And in few days, I will publish post on using the Table per Hierarchy in the Application with CRUD operations and Table-Per-Type example and explanation.
Thanks,
Paras Sanghani
TablePerHierarchy


